
In Part I and II of this article series, we saw how to create a Microblaze based embedded platform for Saturn Spartan 6 Module and build Linux kernel for it. In this tutorial we will take a look at how to download the kernel image to Saturn and boot using Xilinx Platform cable USB and XMD (Xilinx Microprocessor Debugger). Xilinx Platform cable USB slightly expensive, but if you don’t have one don’t loose hope. There is still a way to download the kernel and boot. This is discussed in Part IV of this article series.
Before we continue, we need to make sure that the channel B of the onboard FT2232H is configured as USB serial port. Configuring FT2232H is covered in the article Configuring FT2232H USB Serial converter on Saturn Spartan 6 Module. Please follow the steps in the article and configure FT2232H appropriately. Once successfully configured, a new serial port should appear in Windows Device Manager that corresponds to FT2232H channel B. We will use this serial port as a serial terminal through which we will interact with Linux.
Assuming you have hooked up Xilinx Platform cable USB properly, we will open the SDK project that we created in Part II of this article series (in Xilinx SDK of course !). Make sure the project builds without errors. Go to “Xilinx Tools” menu in SDK and select “Program FPGA”. When FPGA programming dialog pops up, leave all settings as is and click on “Program” button and let FPGA programming to finish.
Once FPGA programming is finished, we can now communicate with the Microblaze processor through XMD. It is possible to invoke XMD within SDK but I found it very easy and convenient to invoke XMD in a standalone commandline (DOS) window. Before starting XMD, copy “simpleImage.saturn_v3” in the folder /output/images under buildroot directory on Linux build machine to the Windows machine. Open a new commandline window (in Windows) where the kernel image is copied and run the following commands.
cmd>c:\Xilinx\14.6\ISE_DS\settings64.bat
cmd>xmd
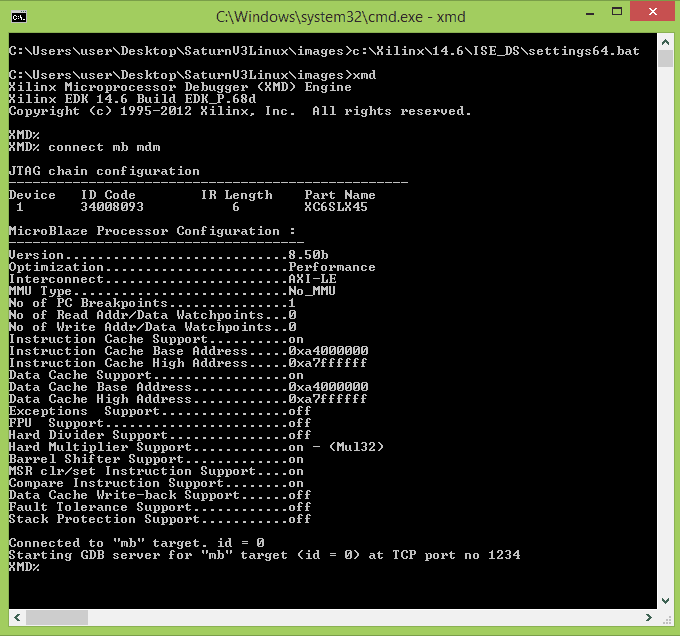
make sure to replace xx.xx with your ISE version and to choose settings32.bat if your system is 32 bit. These commands will start XMD within the commandline window. Now type the following command at the XMD command line to connect to the Microblaze processor running on the FPGA.
cmd>connect mb mdm
If everything went well, you should see XMD spit out some information as shown below.
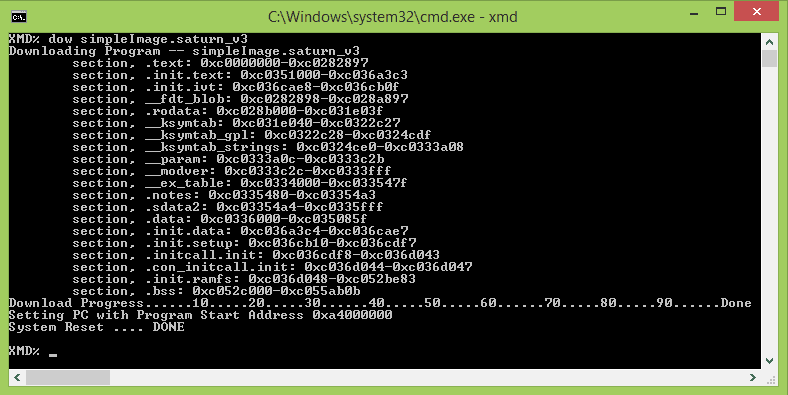
Now we are connected to the Microblaze processor and we can download Linux kernel image. To download the image, run the below command at XMD command line.
cmd>dow simpleImage.saturn_v3
This command should start downloading the image to the DDR memory. Since simpleImage.saturn_v3 is in ELF format, it already contains the DDR address where it should be copied to. If download fails, chances are that you have not updated the Linux kernel base address with the starting address of the LPDDR memory assigned by EDK before building Linux kernel. We have discussed this in the section “Create buildroot configuration” of Part II of this article series. It can take a few minutes to download the kernel image to DDR. Below image shows the download process.
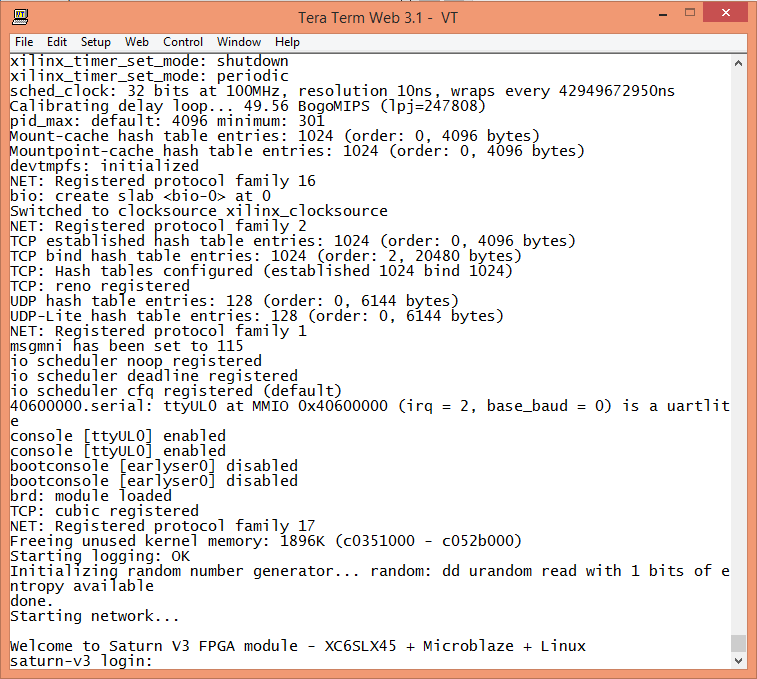
Now we are ready to boot Linux. Open your favorite serial terminal emulation software (hyperterminal, PUTTY, Teraterm etcc..) and open the serial port corresponds to Saturn’s FT2232H channel B. Set baud rate to 115200 and set any handshacking to off/none. Once the terminal software is setup, run the following command at XMD commandline to boot the kernel.
cmd>con 0xa4000000
Make sure to replace 0xa4000000 with the DDR base address/Kernel base address of your system if it is different. If all steps so far went as planned, you should see Linux booting in the serial terminal software as shown below.
The default user is root and no password set for root user. Please note that since the files system is initramfs which is sitting in LPDDR, any changes that you make will not persist.
Congratulations if you followed the steps in this article series and was able to boot Linux successfully. Those who could not successfully boot, please don’t give up and keep trying. You should be able to tackle this without much difficulties. If you have any questions, feel free to ask below in the comments section.
Since Linux kernel image is directly downloaded to DDR memory, you will loose everything when power cycling the board. To make the board boot in to Linux every time you power up the board, we need to put the FPGA bit file and kernel image in the SPI flash. Saturn has 128Mbit (16 Mbyte) SPI flash memory onboard. This memory is large enough to hold the FPGA bit file and Kernel image (You will still have some space left for custom data). Visit Part IV of this article series to see how this is done.
Read Part IV of this article series here.
Is it possible to boot (any configuration of) linux on MicroBlaze without LPDDR RAM(Mimas Spartan6)?
November 3, 2017 at 12:11 pmNo. You need substantial amount of RAM which FPGA’s on-die RAM cannot provide.
November 6, 2017 at 6:26 amlinks of parts II and IV are wrong—
must be:
November 8, 2018 at 4:45 amhttps://numato.com/kb/saturn-microblaze-and-linux-how-run-linux-saturn-spartan-6-fpga-module-part-ii/
https://numato.com/kb/saturn-microblaze-and-linux-how-run-linux-saturn-spartan-6-fpga-module-part-iv/